Saturday, September 28, 2013

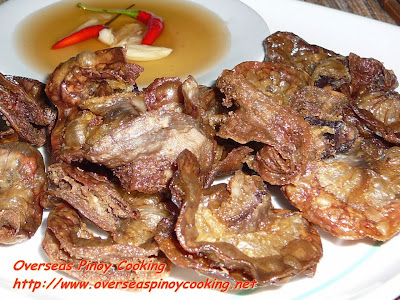
Special Chicharon Bulaklak


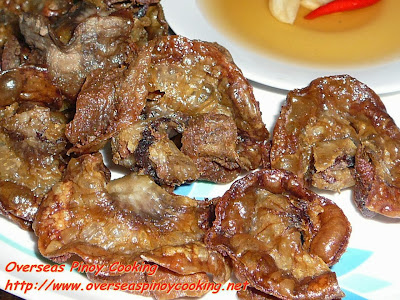
Special Chicharon Bulaklak. The chicharon bulaklak is made up of pig mesentery, the fatty tissue that hold together the pig’s small intestines. Usually for economics reason the small intestines are separated from the mesentery to make two types of chicharons, Chicharon Bulaklak using the mesentery and Chicharon Bituka using the small intestines.


For today’s Special Chicharon Bulaklak I did not bothered to separate the intestines from the mesentery this makes this Chicharon Bulaklak special. Anyway it would be also difficult to buy the mesentery separately from the intestines.


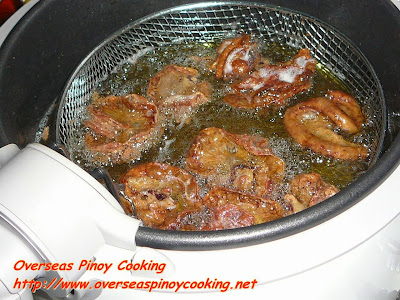
To make the dish the pig innards are pre-boiled till tender with Pinoy aromatic ingredients. For best results I used an electric deep fryer, this is also safer and easier compared to using a deep frying pan or wok. But again if you do not have the convenience of an electric deep fryer you can use the conventional deep fryer just be very careful as there will be a lot of hot oil splashing.


Ingredients:


1 1/2 Kilo pork small intestine with mesentery intact

2-3 pcs bay leaves

1 tbsp peppercorns

1 head garlic crushed

salt

cooking oil


Cooking procedure:


To Clean, Cut the pork intestine/mesentery into manageable sizes. Using a thin sharp knife,make a slit along the outer radius of the small intestine. Wash each pork intestine/mesentery thoroughly with running water. Scrubbing off all solid matter inside the intestines. Do this several time until all the solid particles are removed.


To Pre-boil, put the pork intestine/mesentery in a large sauce pan, pour in water about 2 inches above the intestines. Add in the bay leaf, peppercorns and 1 to 2 tbsp. of salt. Let boil and simmer for 30 to 45 minutes or until tender. Remove the pork intestine/mesentery from the pan and let drain, discard the boiling liquid and other residue. eep refrigerated for several hours to chill or until ready to fry.


To Deep Fry, Cut the pork intestine/mesentery to desired size and evenly season with salt. Add oil on the deep fryer at recommended level. Pre-heat the deep fryer to 200°C or to the highest setting. Now deep fry the pork intestine/mesentery in batches. Expect the oil splashing so replace the deep fryer lid immediately. Deep fry for 3 to 5 minutes or until the vigorous oil splashing has stopped turn over the pork intestine/mesentery. Continue to deep fry until the intestines/ mesentery color has changed into a nice golden. When done remove from the deep fryer and drain oil in a plater lined with paper kitchen towel. Alternately heat generous amount of oil in a deep frying pan. Deep fry for 3 to 5 minutes in batches or until color change to golden brown and crisp, drain excess oil in a kitchen paper towels.


To Serve, serve with vinegar garlic chili dip.


Wednesday, September 25, 2013

Restaurant Review - The Old Vine, Wadhurst


Restaurant name: The Old Vine Inn

Location: Wadhurst, East Sussex

Description: Pretty country pub established in 1515 with a nice restaurant and garden and rooms if you want to stay overnight.

Reason for visit: My boyfriend took me llama trekking as a treat - we went to Bluecaps Llama and spent an hour walking through the woods with two very friendly llamas in tow. We went here for lunch afterwards as it was nearby and had been recommended by the owner of Bluecaps.


Me and my llama

I ate: seafood platter, that was designed for sharing as a (large) starter, but I had it to myself as a main course. It came with crusty bread and butter, mackerel pate, prawn and crayfish cocktail, smoked salmon and prawns in filo pastry, anchovies, capers and salad. I think it cost £15.

My companion ate: ham, egg and chips.


The food was: Mine was a really nice change from what I would normally order as a main course. I know it was designed for sharing but I thought there was too much smoked salmon and I would have liked a little more bread - you can see four pieces in the photo but they were tiny. The crayfish cocktail was served in shot glasses which was a nice touch; the prawns wrapped in filo were very nice but I would have liked something to dip them in. I tried a little of the anchovies but didn't really like them. My boyfriend enjoyed his main course but said it was so filling he would have been happy with just egg and chips without the ham.

The service/atmosphere was: Very good, the bar staff were friendly and when I asked if we could sit outside - having noticed they had a few tables out front near the road, though people were smoking - they showed us to a pretty garden out the back.


ham, egg and chips


Price range/value for money: Good value as portions were large and the food was very good quality.

Would I recommend it? Yes, definitely if you are in the area or fancy a drive in the country. I also recommend Bluecaps Llamas!

Monday, September 23, 2013

Meal Planning 2013 - Week 39


I've been on holiday for eight days so was really pleased to weigh in at Slimming World when I came back and find I'd lost a pound! It must be all the walking.... I also didn't have particularly big meals while I was in Cambodia, and I was so busy sightseeing in Singapore - and so hot, that I drank lots but never really felt hungry, that one day I skipped both breakfast and dinner, and only had lunch! But it was a good lunch, in the famous Raffles Hotel... I'll have to write a review soon!


Anyway I'm trying to catch up on everything now I'm back and am still in the middle of unpacking but thought I had better work out what I'm going to eat over the coming week (and do some food shopping!).


Monday

Breakfast yogurt

Lunch Tuna roll

Dinner Out at choir rehearsal so I will take leftover pizza from my weekend treat - the amount I ate the weekend I got back, I will probably have put back on the pound that I lost!


Tuesday

Breakfast cereal

Lunch out on a teambuilding day with work colleagues

Dinner toad in the hole


Wednesday

Breakfast yogurt

Lunch sandwich

Dinner salmon and veg for me, chicken kiev or similar for the OH (he doesn't eat fish)


Thursday

Breakfast cereal

Lunch baked potato

Dinner out at a colleague's leaving do


Friday

Breakfast yogurt

Lunch sandwich

Dinner Minute steaks marinated with Nando's hot sauce


Saturday

Breakfast yogurt

Lunch bacon sandwich

Dinner formal dinner at Christ's College, Cambridge - it's my 15 year university reunion!


Sunday

Breakfast in college canteen

Lunch possibly a sandwich on the train, not sure what time I will be back

Dinner chicken/pork schnitzel

Sunday, September 22, 2013

Black Eyed Pea with Pork Belly, Pinablad a Pusi


Black Eyed Pea with Pork Belly, Pinablad a Pusi. I have searched high and low for the correct Pilipino word for black eyed peas but it seems there is not in the Google at least. I still remember when I was a kid we call it pusi in Ilocano, but pusi sometimes refer to all dried beans. Pinablad is the Ilocano word for boiled beans similar to Ginisang Mungo – Pinablad a Balatong or KBL – Kadyos, Baboy at Langka.


Pinablad a Pusi is a very popular boiled beans soup dish usually with pork or beef hocks or bones. To make the dish it is basically the same with ginisang mungo. Here is the recipe of my Black Eyed Pea with Pork Belly, Pinablad a Pusi.


Ingredients:


1 kilo pork belly cut into large pieces

3 cups dried black eyed pea, soaked with water for at least 15 minutes

2 large bag baby spinach

3-4 pieces long green chili

1/2 head garlic, chopped

2 thumb size ginger, peeled, cut into thin strips

1 large size onion, chopped

2 large size tomato, chopped

1/2 cup fish sauce

cooking oil

salt


Cooking procedure:


In a large sauce pan put the black eyed peas and add in enough water to about 2 to 3 inches above the beans line, bring to a boil then add the pork belly and simmer for 15 to 20 minutes or until the pork are tender and the black eyed peas start to disintegrate and the desired liquid consistency is achieved. Take out all scum that rises to the surface and add more water as necessary. In a separate wok sauté the garlic and ginger until fragrant add in the onion and tomato and continue to stir cook for about a minute. Add in the fish sauce and continue to stir cook for about a minute the add to the the simmering black eyed peas, continue to cook for about 3 to 5 minutes. Correct saltines if required. Add in the long chili, cook for about 1 to 2 minutes. Now add in the spinach and cook for another half a minute. Serve hot with a lot of rice.


Wednesday, September 18, 2013

Pink Princess Doll Cake


I love this cake - it's so girly! Yes, this is indeed a cake - or rather, the bottom half of the doll is cake. Her dress is made of fondant and her skirt is a chocolate cake - a delicious vegan recipe. In this post I'll also explain how to use a Garrett frill cutter, a piece of equipment I bought when I took a cake decorating class last year, and also review a brilliant new product I found at Ikea.


So how did this cake come about? Well, my friend Ros - who some of you know as The More Than Occasional Baker - decided she wanted a pink princess theme for her birthday party in September. We might be in our 30s but that's no reason not to embrace our inner child... or our inner princess! I was very honoured when she asked me to make her a birthday cake, as Ros is such an amazing baker herself. As soon as she told me the theme I thought of this cake - I'd seen pictures of them before but never made or eaten one. You basically take a doll, like Barbie or Bratz, bake a dome-shaped cake, and stick the doll in the middle and decorate the cake to look like her dress!


Ros also told me that one of her friends was vegan so asked if I could make a vegan cake. That was no problem - one of my closest friends is vegan so I've tried a few recipes and found this amazing vegan chocolate cake, it tastes nicer than almost any chocolate cake I've ever had!


My first challenge however was to find a doll. I didn't want to buy a brand-new Barbie as they're not cheap, and I don't know any children I could borrow one from, so luckily found some dolls in my local charity shop. Yes, I did wash it thoroughly!


I made the batter for the chocolate cake - as it is vegan, it doesn't use eggs or butter, but instead uses oil which makes it deliciously moist. You also use a cup of hot water in the mixture, which makes it a pretty runny batter, but it bakes really well. See here for the recipe.


I decided to bake the cake in a Pyrex ovenproof dish so it would be the right shape. I sprayed the bowl with Cake Release Spray and it did come out very smoothly.


Ready to go in the oven. I found it took a lot longer to cook than expected, I guess because the cake is so deep in the middle. I tested it a few times with a cake tester and put it back in the oven until I was happy it was cooked through.


I turned out the cake and allowed it to cool. I didn't think it was going to be big enough however, so I whipped up another batch of the same mixture, and cooked it in a small-ish (I think 7 inch) round cake tin.


The dome cake fit perfectly on the top of the round cake. If the round cake had been too big, I would have trimmed around the sides.


You can make vegan buttercream very easily, by using vegan 'margarine' such as Vitalite or Pure. Mix with icing sugar and cocoa powder.


I spread a thick layer of buttercream on the base cake and sat the dome cake on top.


I made a small circular hole with my cake corer (which is designed to make holes in cupcakes to fill them). It made a perfectly-sized round hole, though it didn't go very deep so I used a spoon to extend the hole downwards. I wrapped my Bratz doll in clingfilm from the waist down (after having thoroughly washed her, of course) and placed her in the cake. The perfect fit!


Now onto a product I bought only the day before which I was very pleased with. My boyfriend and I went to Ikea to buy a bookcase - as an aside, he has just moved in and saw how my cookery books were taking over the kitchen, as I have so many - and rather than suggesting I get rid of some, he went out to buy me a new bookcase for the living room to put them in. Readers, he's a keeper. Of course, he did manage to buy the wrong bookcase so we have to go back - which is not necessarily a bad thing! I've only been to Ikea a few times and when I do, I really enjoy browsing around their 'marketplace' area. I've picked up some nice cake tins and cookie cutters from there in the past, and this time found a rolled-up silicon baking mat and plastic knife for £9. I'm sure I remember seeing something similar at last year's Cake International for £40!


I always have a problem when rolling out fondant, as I don't have enough space on my kitchen worktop - they are not that wide and also my cookery books were lined up against the wall (not for much longer!). My dining room table has grooves as it has extendable sections, so I'm limited with what I can roll out on there too, and if I use a chopping board then I'm also limited. This mat is huge - 62cm x 45cm - and has patterns on both sides you could use as a template if you were piping or cutting something.


I coloured some fondant pink and rolled it out.


The mat is really thin and lightweight so it was very easy to pick it up, turn over so the fondant was covering the cake, then peel the mat off the back - so I covered my cake in one swift movement. I'm really pleased with this mat and can see myself using it a lot!


I took some of the same fondant and made a bodice for the doll. The fact that it was separate to the cake meant I could actually take the doll out and fit the cake in a standard cake carrier with the doll separate, then reassemble when I arrived at my friend's house.


I tried to fold the fondant in a few places so it looked like pleats on her dress, though I'm not sure I would bother with this next time.


I wanted to decorate her dress with some frills, and I have a Garrett frill cutter I bought for a cake decorating course (but then we never actually had time to use it). I had to look up on the internet how to use it, so I thought I would give instructions here. Mine was from PME and came with a wheel and three centre pieces of different sizes, which give different widths of frill. You clip the centre piece into the wheel. I've rolled out my icing - I used a mixture of flower paste and fondant so it would be stiffer than just fondant - and got the wheel ready here.


You just use the wheel to press down as you would a cookie cutter. You don't need the inner circle, just the outer one of what you cut out.


Take the outer piece and make a cut so you open the circle out. You then need a balling tool and ideally a foam pad; you need to gently rub each 'spoke' on the wheel until it curves upwards.


Then fasten onto the cake with edible glue. I did two layers all the way around.


I am going to hide the joins later


I used a butterfly plunger cutter and some fondant that I had coloured a slightly darker pink to make some nice shapes.


I attached these with edible glue at the places where the frills joined.


I also put a butterfly at the top of the doll's bodice and used the frill cutter with the darker fondant to go around her waist.


Here's the finished cake - a bit silly and very pink, but I think little girls - and not so little girls - would love this!


I am sending this to We Should Cocoa as the theme this month is 'chocolate showstoppers' and I think this cake is definitely a showstopper! The challenge is hosted by Choclette of Chocolate Log Blog.